26 August 2011

Royal Navy Westland Lynx HAS.3 No. 829 NAS - HMS Endurance


This is the Hobby Boss 1:72nd scale kit


This particular aircraft supported research operations in the antarctic along with the ship HMS Endurance


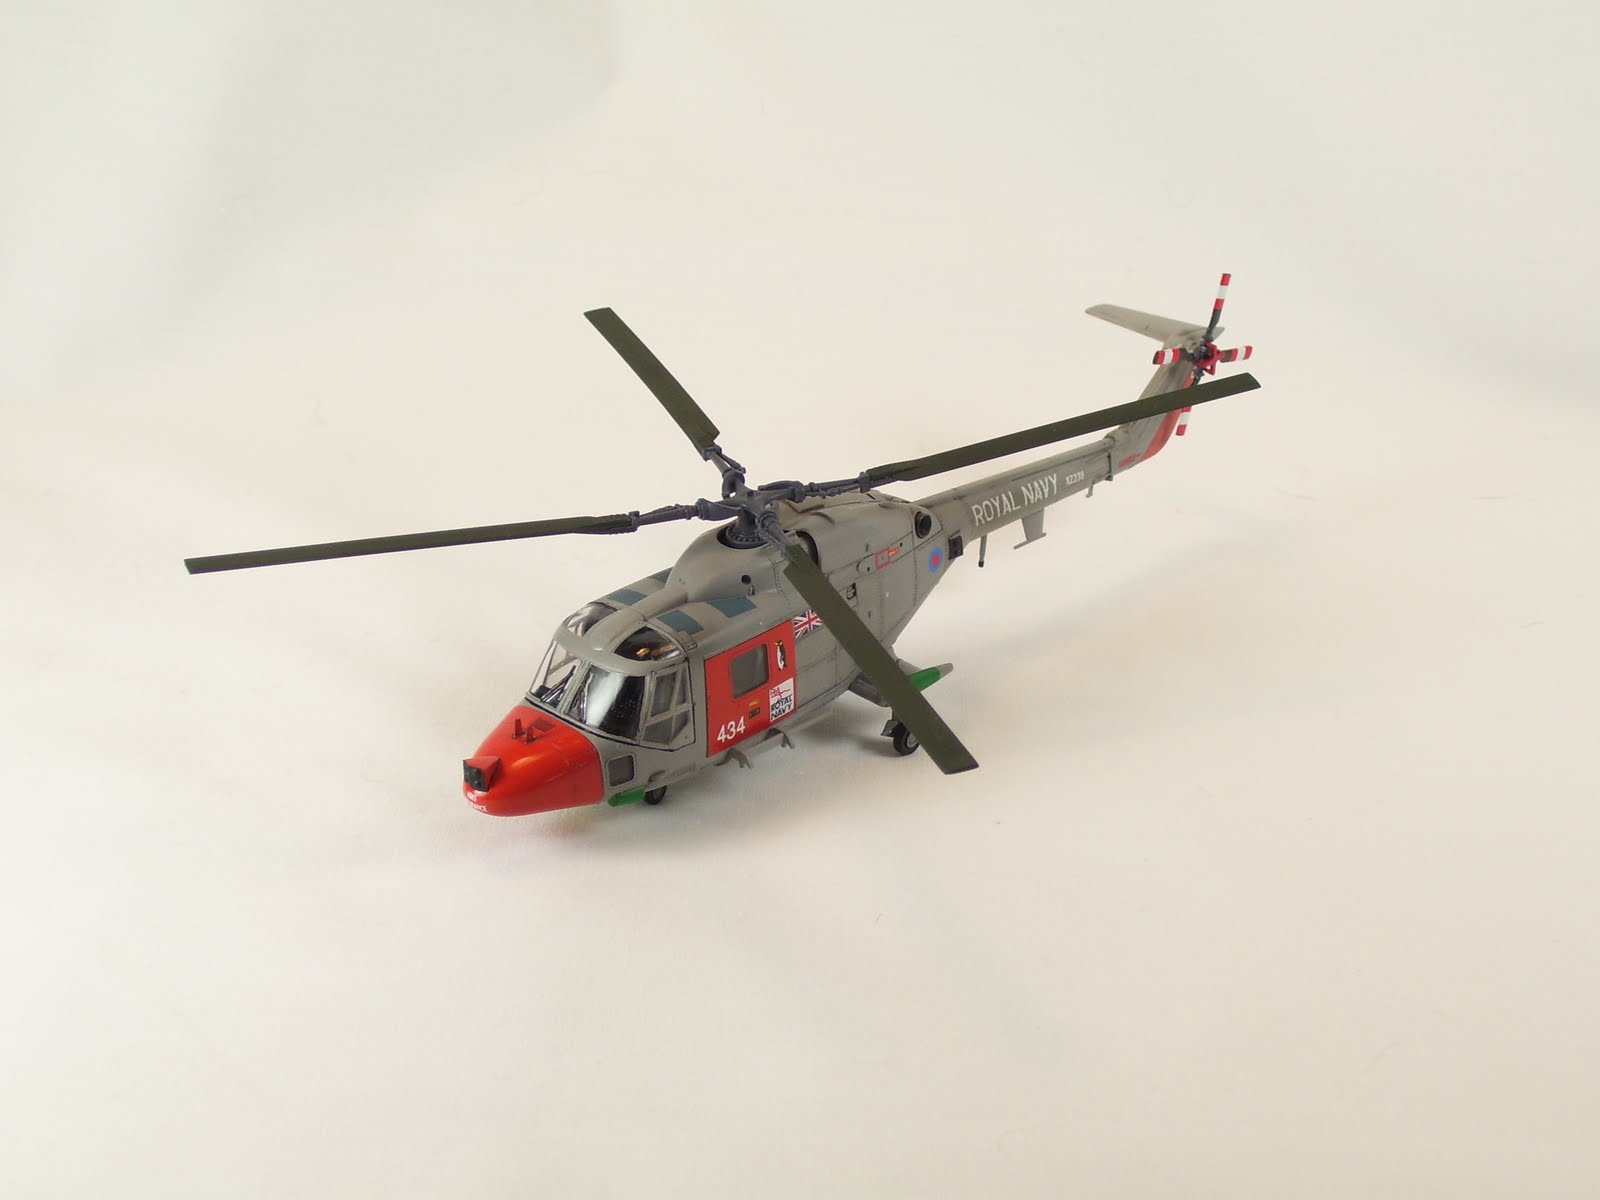
The kit was built straight from the box following the instructions. The only "custom" additions I added were simulated seat belts made from Tamiya tape painted grey. I also removed the tail bumper because the Lynx didn't have one on this particular aircraft and I didn't add any ordinance (torpedoes or anti-ship missiles) as instructed because Antarctic treaties disallowed war shots on these helicopters.


11 June 2011

Academy 1:35th M163 Vulcan SPAAG - Vietnam


I recently completed this kit in time for IPMS Niagara Frontier's annual show and contest called BuffCon this past April. I am pleased to say that it took first place in it's category at the show. 


I built it out of the box but did add my own antennae from Plastruct rod stock and the tow cable on the back door is fine gauge twisted wire. The majority of equipment tie-down brackets were sliced off of the kit and replaced with small staples bent to shape. The model was painted with Tamiya acrylics through an airbrush and detail painted with a variety of Model Master and Polly Scale acrylics.


Weathering was accomplished with Jeff Herne's line of Warpigs weathering powders mixed to match the red-tinted dirt typically found in Vietnam. 

26 May 2011

Realistic Tow Cables for Amored Vehicles - Part 3

In the previous two posts, I demonstrated how to replace a broken or inaccurate plastic model kit part (tow cables) with better detailed twisted wire.(see Realistic Tow Cables for Armored Vehicles - Parts 1 & 2 in this blog).  Now, I'll show how to mount these to the kit. I'm in the middle of building Tamiya's 1:35th scale US Army M1A2 Abrams Main Battle Tank kit.

Here is the Abrams turret with the modified kit part tow cables tacked in place. In order to add more detail, I'll add the mounting brackets to hold the cable to the turret, similar to the real tank.


Using the two modified tow cables, take one and tack it in place on the side of the turret, following the kit instructions. When the glue has cured enough that the cables won't fall off, drill a series of holes in the turret as seen in the photograph above. These are for the three simulated brackets I'll be making out of fine brass wire. Use reference photos of a real Abrams or use the old kit parts as a guide for placement. In photos, there are five L-shaped mounting brackets to hold each cable in place. For simplicity's sake, I'm going to use three brackets per cable and make them U-shaped so that I'm ensured that they will be secured to the vehicle.

Tools and materials needed to create and assemble tow cable mounting brackets. clockwise from the top: (1) Cyanoacrylate (thin and thick varieties); (2) Sprue cutters; (3) Fine point tweezers; (4) Soda-pop bottle cap used as a CA receptacle with fine wire applicator; (5) Three pieces of brass wire cut into 10mm lengths; (6) Spool of 28-gauge brass beading wire; (7) partially assembled model turret of the M1A2 Abrams tank with tow cables mounted to it.


To create the simulated mounting brackets, I used 28-gauge brass wire cut into approximately 10mm lengths. I made three of these for each tow cable for a total of six pieces of wire.
Grasp one of the 10mm lengths of wire with the fine point tweezers and bend it into a U-shape. Align the wire ends with the holes that were drilled in the side of the turret and insert the wire. You may need to pinch or spread the legs of the U as needed to ensure alignment. 

Make sure that the U wire sits securely against the tow cable. Apply a drop of thin CA followed with a drop of accelerator to secure. Repeat this step for the remaining five sets of holes in the turret.

Brass wire bent into a U-shape for insertion into the turret holes. Secure each leg of the U with a drop of CA followed by accelerator.


A photograph of an M1A2 Abrams Main Battle Tank in Iraq. Note the location, position and mountings of the tow cables along the bottom edge of the turret.Using references like this can greatly aid in making more detailed models (Photo courtesy of Military-Today.com)


23 May 2011

Realistic Tow Cables for Armored Vehicles - Part 2

This is the second installment of my previous post, "Scratch-building Tow Cables for Armored Vehicles" where I demonstrated how I took a broken kit part and replaced it with a more accurate looking one from a hardware store-procured twisted wire picture hanging wire.  Here, I will show how I added the metal ferrules to the cable/tow eye by using thin metal from "tea candles" obtained from a dollar store. I will also show how I added more accurate looking mounting brackets that attach the cables to the turret with fine gauge brass wire.


This is modified tow cable created in Part 1. A scratch-built ferrule is being prepared to add another level of detail.


A ferrule is a metal sleeve used to prevent wire cable from unraveling. To make the ferrule, I used the thin aluminum that is found as the base for tea candles. It is easily cut, smoothed and shaped for a variety of scratch-building tasks.  I found that the candle was easy to pop out of the metal "cup". By using scissors I cut the stamped aluminum candle base away from the sides of the cup. I was then able to smooth the resulting strip flat by pressing it down on the work surface and scraping my metal bench ruler along it's length several times. As you can see, the edges are very ragged, so I removed them with a sharp No. 11 Xacto knife and a straight edge. In the photograph below, here are the materials needed to reclaim the aluminum to make the parts:

Clockwise from the upper left corner: (1) tea candle; (2) tea candle with the candle removed and the resulting aluminum "cup"; (3) the cup base (discard) and the ragged-edged "wall" of the cup. This is what I'll use as the metal strip for the ferrule; (4) Clean aluminum strip stock after it was trimmed and flattened; (5) Sharp No. 11 Xacto knife blade; (6) Metal straight-edge.


To make the ferrule, use the Xacto knife and straight-edge and cut a strip of aluminum approximately 1.0mm wide and 5.0mm long for each tow-eye. These measurements are approximations. I'm not a "rivet counter", which is a modeler who is very detail-oriented to the point where every part must be exact. There is nothing wrong with this at all, it's just that I like to move things along when I build and if I can improve the looks of something, I'm willing to sacrifice a bit of accuracy. To me, it'll still look like an Abrams tow cable in the end.


Wrap a beginning bend around the cable at the butt end of the tow-eye and crimp it in place with fine tweezers. Apply a drop of super glue to the joint, followed by a drop of accelerator. Complete the wrapping of aluminum tightly around the cable by one and half more turns. Gently crimp in place and apply another drop of super glue with a fine wire applicator. Follow up with a drop of accelerator and blot dry with a paper towel. Finish it off by feathering the exposed aluminum overlapped end with a medium grit sanding stick. Repeat this for each tow-eye. The finished product will look like this:


Here the completed, modified tow cable is glued in place along the bottom of the Abram's turret. What needs to be done is add the cable mounting brackets. Based on references, I'm going to make brackets out of fine brass wire.


19 May 2011

Realistic Tow Cables for Armored Vehicles - Part 1

This post is going to show how I made realistic tow cables for my current build of Tamiya's US Army M1A2 Abrams Main Battle Tank. 

The boxart for the Tamiya 1:35th scale Abrams M1A2 Main Battle Tank

What inspired me to replace the kit offering is two-fold. One, it is very difficult to remove the mold seam from a detailed plastic part such as a tow cable without creating flat spots or eradicating the fine detail. Two, I broke the plastic cables while I was removing them from the sprue. While repairing the breaks is possible by using solvent cement or super glue (cyanoacrylate), I would still risk further damage during the clean up after the repair was made. 

With this in mind, I set out to find a way to add more detail by using other materials I have at hand. I remembered a demonstration at an IPMS Niagara Frontier meeting conducted by Master Modeler Joe Szczygiel where he used common picture-hanging wire for a variety of modeling super-detailed parts. I scrounged through my garage and found a small spool of said wire and went about seeing if the scale was correct for what I wanted to do...and it was.

Parts needed to modify broken kit parts to rebuild wire rope tow cables. Clockwise from the top: (1) broken plastic kit cables; (2) spool of twisted strand picture hanging wire; (3) Kit plastic tow-eyes dry-fitted to the wire; (4) Kit plastic tow-eyes ready to be mounted to the wire. Note how the wire has a more natural and realistic look to it than the plastic parts.
To begin the modification, cut the tow eyes from the kit parts by using nippers, a razor blade or fine saw. My preference is to use a standard No. 11 Xacto blade. Sand the butt end of the eye flush. Take the tip of the Xacto blade and press a divot in the plastic. Make it in the dead center of the butt end. This is going to be the pilot hole for drilling into plastic kit part with micro drill bits. Using a small micro drill bit in a pin vise, start drilling out the plastic. Be careful not to go through the part and keep the bit centered. It should be as straight as possible. Use progressively larger diameter drill bits and test fit the wire cable ends periodically. Stop drilling when the wire can be easily inserted into the tow eye. If you see the close-up in the photo above, this is what you're trying to achieve.
The end result of micro-drilling into the end of the tow-eye to accommodate the end of the wire cable. Test fit periodically to ensure the cable is a tight fit. Keep your drilling as straight as possible and do not drill through the part.


The next step is to test fit and cut the cables to the proper length and then secure them into the tow eyes. On the Abrams, the tow cables are mounted to the sides of the turret along the lower edge. I have inserted the cable into the eye and secured it with thin super glue (not pictured, but is at the far left of the picture, out of view). That end was tacked in its proper place per the kit instructions and the cable laid along the base of the turret. Take the other tow eye and place it where it belongs on the turret. You can accurately measure the length needed with ruler or use your eye to guesstimate the length (that's what I did). Mark the cable where you want to cut it. I use a fine point Sharpie marker. Cut the cable and insert the second tow eye. Secure it with a drop of super glue.


Here the modified cable is being held against its mounting point on the Abrams turret to test fit its proper length


Marking the cable with a black marker to indicate the proper cut

Here is the finished product. The tow eyes were removed from the broken kit parts and any mold seams cleaned up. The sockets for the wire were made by drilling holes with progressively larger sized micro drills until a firm fit was obtained. The cables were inserted into the tow eyes and rotated until they were aligned properly for mounting to the turret of the tank. Finally, the cables were secured into the sockets with drop of super glue applied with a fine wire applicator.
Finished modified tow cable ready to be mounted to the Abrams turret


The Abrams MBT is equipped with two sets of tow cables, mounted on either side of the turret. Even though I broke only one of the kit parts, I still replaced both of them with the above described methods. I did this to ensure both looked the same. To me, the twisted wire cable looks far more accurate than what is provided in the kit. The total extra time I spent scratchbuilding them was about an hour. This is about the same amount of time I would have spent trying to scrape and sand the mold seam off of the plastic kit parts, but yielded a far more accurate product.


In my next installment, I will show how I reproduced the ferrules (the metal sleeves at the base of the tow eyes to prevent unraveling). on the cable and how to mount them to the turret using brass wire.  A 21-gun salute of thanks goes to Master Modeler Joe Szczygiel of IPMS Niagara Frontier for mentioning the picture hanging wire as a means of scratch-building many things in miniature.